스프링 부트 - 스프링 시큐리티(Spring Security)
- 스프링 시큐리티는 사용자를 인증(Authentication)하고, 로그인후 프로그램의 각각의 기능에 대한 권한을 체크(Authorization)하는 작업을 구현해둔 보안 프레임워크 이다.
- 간단하게 스프링 부트에서 스프링 시큐리티를 연동해보자.
- 의존성 추가
1
2
3
4
5
6
7
8
9
10
11
12
13
14
15
16
17
18
19
20
21
22
23
24
25
26
27
28
29<dependencies>
<dependency>
<groupId>org.springframework.boot</groupId>
<artifactId>spring-boot-starter-web</artifactId>
</dependency>
<dependency>
<groupId>org.springframework.boot</groupId>
<artifactId>spring-boot-starter-security</artifactId>
</dependency>
<dependency>
<groupId>org.springframework.security</groupId>
<artifactId>spring-security-test</artifactId>
<version>${spring-security.version}</version>
<scope>test</scope>
</dependency>
<dependency>
<groupId>org.springframework.boot</groupId>
<artifactId>spring-boot-starter-thymeleaf</artifactId>
</dependency>
<dependency>
<groupId>org.springframework.boot</groupId>
<artifactId>spring-boot-starter-test</artifactId>
<scope>test</scope>
</dependency>
</dependencies> - 스프링 시큐리티와 시큐리티 테스트, 타임리프 의존성을 추가한다.
Application.java1
2
3
4
5
6
7
8
public class Application {
public static void main(String[] args) {
SpringApplication.run(Application.class, args);
}
}HomeController.java1
2
3
4
5
6
7
8
9
10
11
12
13
public class HomeController {
("/hello")
public String hello(){
return "hello";
}
("/my")
public String my(){
return "my";
}
}WebSecurityConfig.java1
2
3
public class WebSecurityConfig extends WebSecurityConfigurerAdapter {
}WebSecurityConfigurerAdapter를 상속받아 시큐리티 관련 설정을 할 수 있다.
index.html1
2
3
4
5
6
7
8
9
10
11
12
<html lang="en">
<head>
<meta charset="UTF-8">
<title>Title</title>
</head>
<body>
<h1>Welcome</h1>
<a href="/hello">hello</a>
<a href="/my">my page</a>
</body>
</html>
hello.html1
2
3
4
5
6
7
8
9
10
<html lang="en">
<head>
<meta charset="UTF-8">
<title>Title</title>
</head>
<body>
<h1>Hello</h1>
</body>
</html>my.html1
2
3
4
5
6
7
8
9
10
<html lang="en">
<head>
<meta charset="UTF-8">
<title>Title</title>
</head>
<body>
<h1>My</h1>
</body>
</html>
위와 같이 코드를 작성하고 Spring Security의존성이 추가된 상태로 애플리케이션을 실행하게 되면 다음과 같은 화면으로 이동한다.

어떤 페이지를 요청하여도
/login으로 이동하게 되며 로그인을 해야 다른 페이지를 사용 가능하다.- 기본 ID는 user이고 password는 다음과 같이 콘솔에 출력되는 것을 입력하면 된다.(password는 매번 달라진다.)

- 기본 ID는 user이고 password는 다음과 같이 콘솔에 출력되는 것을 입력하면 된다.(password는 매번 달라진다.)
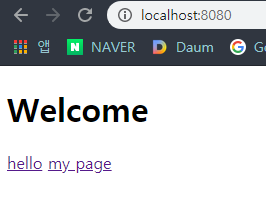
로그인을 하면 다음과 같이 index화면으로 넘어가게 된다.

- 테스트 코드
HomeControllerTest.java1
2
3
4
5
6
7
8
9
10
11
12
13
14
15
16
17
18
19
20
21
22
23
24
25
26
27
28
29
30
31
32
33
34(SpringRunner.class)
@WebMvcTest(HomeController.class)
public class HomeControllerTest {
MockMvc mockMvc;
public void hello_without_user() throws Exception {
mockMvc.perform(MockMvcRequestBuilders.get("/hello"))
.andDo(print())
.andExpect(status().isUnauthorized());
}
public void hello() throws Exception {
mockMvc.perform(MockMvcRequestBuilders.get("/hello"))
.andDo(print())
.andExpect(status().isOk())
.andExpect(view().name("hello"));
}
// 가짜 유저 인증 정보
public void my() throws Exception {
mockMvc.perform(MockMvcRequestBuilders.get("/my"))
.andDo(print())
.andExpect(status().isOk())
.andExpect(view().name("my"));
}
} @WithMockUser는 가짜 유저 인증 정보를 추가할 수 있다. Spring Security의존성을 추가하고 어노테이션을 붙이지 않은 상태로 테스트를 한다면 인증되지 않았다는 에러 메세지가 발생하지만@WithMockUser로 인증 정보를 추가한 메서드는 정상적으로 동작한다.hello_without_user는 어노테이션을 붙이지 않았으므로 인증되지 않았다는 401 상태 코드를 응답받는다.
참조
https://www.inflearn.com/course/%EC%8A%A4%ED%94%84%EB%A7%81%EB%B6%80%ED%8A%B8/dashboard